
The FARA 83 is a fast-firing fully automatic Assault Rifle in Cold War. The FARA also has very manageable recoil so it’s easy to use for pretty much anybody, noob or veteran.
Today’s guide will discuss the weapon stats and breakdown the best attachments and class setups to run on the FARA 83. We provide three class setups to cater to everybody’s playstyle.
Weapon background
The FARA 83 is the Galil from previous Call of Duty titles. It was a fan favorite in Black Ops 1. It has always been known to be a solid choice for pretty much everyone who enjoys running ARs.
Stats
- Damage: 31
- Rate of Fire: 800 RPM
- Recoil: Low
We can see from the stats above that the FARA 83 is a 5 to 6 shots to kill assault rifle. The weapon has a 1.25X headshot multiplier so players would need to land at least 2 to make a difference to the time to kill.
Best Attachments
The best attachments for the FARA 83 in Black Ops Cold War are the:
- 18.1” Takedown Barrel
- Spetsnaz Grip
- GRU Elastic Wrap
- 40 RND Mags
The 18.1” Takedown Barrel extends the range of the weapon, while the Spetsnaz Grip turns the weapon into a laser beam with literally no recoil. The GRU Elastic Wrap gives the weapon a boost in overall usability and handling speed.
Best Class Setups
Below are the top 3 class setups for the FARA 83. These class setups are varied to suit a range of playstyles.
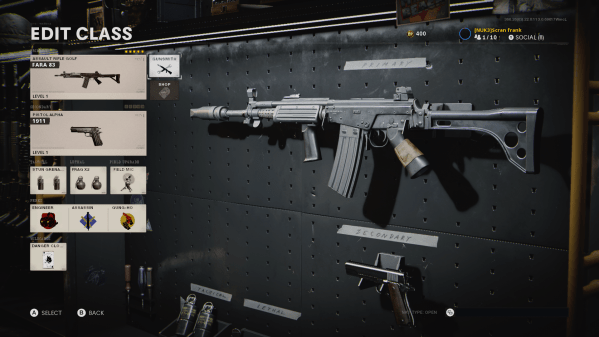
Class 1 – FARA 83 Green For Go
The Green For Go class setup is built for speed and aggression in mind. It’s a great class for playing the objective and staying in the gunfight. Attach the following onto the FARA 83:
Gunsmith:
- Muzzle Brake 5.56
- 18.1″ Takedown
- Spetsnaz Speedgrip
- 40 RND Mags
- GRU Elastic Wrap
Class Setup
The remainder of the class setup utilizes the Perk Greed Wildcard to max out perk effectiveness. Flak Jacket and Scavenger are great perks when you’re defending hardpoints or flags in Domination. The Diamatti is a trusted secondary in any class. We recommend running Akimbo if you have it unlocked.
- Secondary: Diamatti
- Perk 1: Flak Jacket / Paranoia
- Perk 2: Scavenger / Quartermaster
- Perk 3: Ninja / Spycraft
- Lethal: Tomahawk
- Tactical: Stun Grenade
- Field Upgrade: Field Mic
- Wildcard: Perk Greed
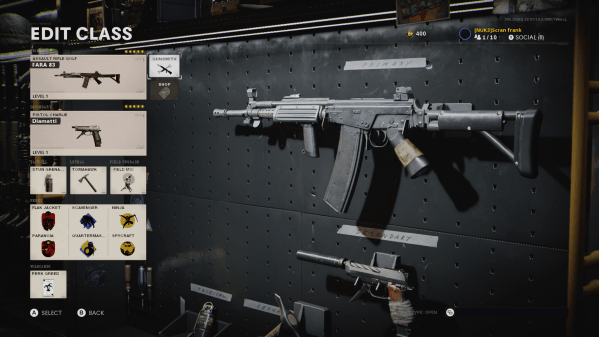
Class 2 – FARA Nuclear Warfare
The second FARA 83 class is built for all-out Nuclear Warfare. The best part of this gunsmith setup is the weapons zero recoil. Attach the following onto the AR:
Gunsmith:
- KGB Eliminator
- 18.7″ Spetsnaz RPK Barrel
- Spetsnaz Grip
- VDV 50 RND Fast Mag
- GRU Elastic Wrap
Class Setup
The remainder of the Nuclear Warfare class setup is built with a focus on stealth and reconnaissance. The perks below are an insane combo for staying off the enemy radar while simultaneously staying one step ahead of where the enemy is located.
- Secondary: Knife
- Perk 1: Engineer / Paranoia
- Perk 2: Assassin / Gearhead
- Perk 3: Gung- Ho / Ghost
- Lethal: Stun Grenades
- Tactical: Frag
- Field Upgrade: Field Mic
- Wildcard: Perk Greed
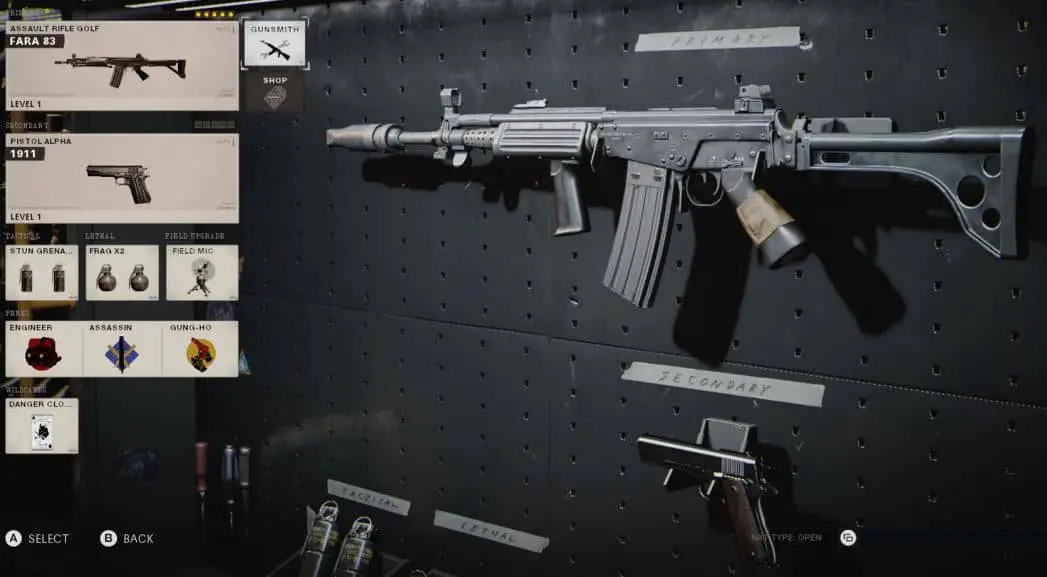
Class 3 – FARA Sneaky Assassin
The third and final class setup is made for sneaky players who like to get around the map nice and stealthy. The GRU Suppressor combined with the 18.1” Takedown Barrel turns the weapon into a snake on the battlefield.
Gunsmith:
- GRU Suppressor
- 18.1″ Takedown
- Spetsnaz Grip
- GRU Elastic Wrap
- KGB Skeletal Stock
Class Setup
The rest of the Sneaky Assassin class setup uses Engineer, Assassin, and Gung-Ho as perks. The use of Danger Close gives you two Stun and Frags Grenades to launch at your foe.
- Secondary: 1911
- Perk 1: Engineer
- Perk 2: Assassin
- Perk 3: Gung-Ho
- Lethal: Frag x2
- Tactical: Stun Grenades
- Field Upgrade: Field Mic
- Wildcard: Danger Close
CONTRIBUTOR: NUKE x MUNTA