
We always recommended people use RetroArch and Launchbox together. This is mainly because it provides an easy and stress-free setup so you can play your retro games as quickly as possible.
However, for PS2 games specifically, we recommend PCSX2 over every other emulator. The RetroArch cores are great. But, they don’t allow saving the state of the emulator which can be annoying when you want to save your game at a specific time, especially after a hard boss or mission.
There are other reasons to use PCSX2 in Launchbox and we’ve laid them out below.
So, why would someone want to add PCSX2 emulator to Launchbox? Well, if you have a bunch of PS2 games that you want to play on your computer, PCSX2 is the go-to emulator for that. By adding PCSX2 to Launchbox, you can have all your PS2 games neatly organized within Launchbox’s interface.
You’ll be able to see the game titles, cover art, and other details in one place, making it convenient to browse through your PS2 game collection.
When you’re ready to play a PS2 game, you can simply select it within Launchbox, and Launchbox will launch PCSX2 with the game loaded and ready to go.
It saves you the hassle of manually opening PCSX2 and navigating through its menus to load each game. Launchbox makes the process more streamlined and user-friendly.
Additionally, Launchbox offers some handy features like automatic metadata downloading, which means it can fetch game information, cover art, and other details from online databases. This helps in creating a visually appealing and informative collection of your PS2 games within Launchbox.
So, in a nutshell, adding PCSX2 to Launchbox allows you to integrate your PS2 game collection into Launchbox’s organized interface, making it easier to browse and play your favorite PS2 games on your computer. It adds convenience and a visually pleasing experience to your gaming setup.
How To Add PCSX2 To Launchbox
Step 1: Download and install PCSX2 and Launchbox
First, you’ll need to download and install the PCSX2 emulator on your computer. You can go to the official PCSX2 website (just search for “PCSX2” in your favorite search engine) and find the download link. Once downloaded, run the installer and follow the on-screen instructions to install PCSX2.
Next, you’ll need to download and install Launchbox. Head over to the Launchbox website (search for “Launchbox” in your chosen search engine), and you should find the download link there. Download the installer and run it. Launchbox will guide you through the installation process. If you’re not sure how to set up Launchbox, check out our guide.
Step 2: Open Launchbox and set up PCSX2
Once Launchbox is installed, launch the application. You’ll be greeted with the Launchbox interface. To add PCSX2 and your PS2 games, we first need to set up PCSX2 in Launchbox.
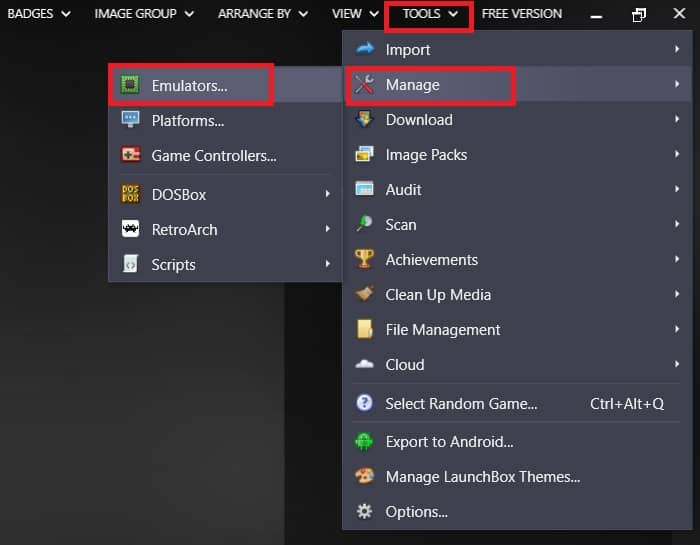
Click on the “Tools” tab at the top of the Launchbox window and select “Manage.” In the Manage menu, click on the “Emulators” option. Then, the wizard will open.
Step 3: Configure PCSX2 emulator settings in Launchbox
Now, you’ll need to tell Launchbox where your PCSX2 emulator is located on your computer. On the wizard click “Add” at the bottom left. This will bring up the Add Emulator wizard(see below)
First, type in PCSX2 into the Name field. Next, click on the “Browse” button next to the “Application Path” field. Navigate to the folder where you installed PCSX2 (typically, it’s in the “Program Files” or “Program Files (x86)” folder). Select the PCSX2 executable file (it should be named “pcsx2.exe” or something similar), and click “OK.”
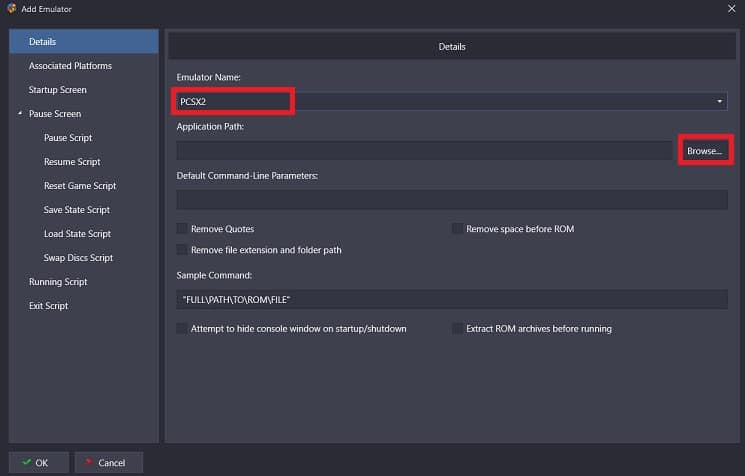
Finally, the field named, Default Command-Line Parameters, may default to “~ parameters”. We suggest leaving this field blank.
Step 4: Import your PS2 games into Launchbox
Once you’ve set up the PCSX2 emulator path, click on the “Tools” button, then Import – ROM Files. Now, you’ll see a wizard window asking you to browse either a Folder or an individual file. We recommend keeping all your PS2 ISOs in one folder.
Click on the “Add Folder” button and navigate to the folder where your PS2 game files are stored on your computer. Select the game files/ folder you want to import into Launchbox (you can hold down the Ctrl key to select multiple files) and click “OK.”
Launchbox will start importing your PS2 games. It will automatically fetch metadata, cover art, and other details for each game from online databases (make sure your computer is connected to the internet during this process). You’ll see the progress of the import, and once it’s complete, you will see your games library update.
Step 5: Customize your PS2 game library in Launchbox
At this point, you have the option to customize your PS2 game library within Launchbox. You can edit game titles, artwork, descriptions, and more. You can also organize your games into categories or playlists.
Step 6: Finish the setup and game
That’s it! You’ve successfully added PCSX2 to Launchbox and imported your PS2 games. Now, when you launch Launchbox, you’ll see your PS2 game library in the interface. You can browse through your games, select one, and Launchbox will automatically launch PCSX2 with the game loaded and ready to play.
Enjoy playing your PS2 games all from one user interface, it’s pretty sweet!