How to survive your first day and night?
So you have decided to play Minecraft Survival. Welcome to the epic world of blocks. When first starting, Minecraft can be overwhelming. There is a lot to do and a lot to learn. This guide will teach you how to play Minecraft survival. It covers everything from learning the basics to building your first home. This is the most in-depth and helpful guide you will find on how to survive your first night in Minecraft survival.
Learning The Basics
The User Interface. What do the hearts mean?
There are 4 measurements of your in-game status at the bottom of the screen.
- Hearts which represent your health.
- Drumsticks which represent your hunger.
- An empty bar that fills with green which represents your experience.
- A bar of blocks which represent items that you can use and wear.

Different material and its durability
You will use different materials to make things. Not all material is the same and not all last the same amount of time. Below is some of the most common material you will be using in Minecraft.
The weakest material in the game is wood. It’s great for starting but it doesn’t last long. Next in line is stone, this is much stronger and will last a lot longer. Then there is iron. Iron is very strong but not the strongest in the game. Finally, we have diamond, this is the best material in the game and by far the strongest.
Minecraft Mobs
Mobs are the various creatures you see throughout the Minecraft world. Some are hostile and some are friendly while some will only attack if you attack them. Let’s talk a little bit about them. The hostile mobs are the most important to know. As they will attack you on sight and can kill you.
Most Common Hostile Mobs in Minecraft
| Mob | Description and details | Appearance |
| Creeper | Creepers are little green creatures that spawn everywhere at a light level of 7 or less. They will mainly be found at night time. Creepers blow up if you get too close to them. So keep your distance. Note, creepers can survive day time if they have spawned during the night. | 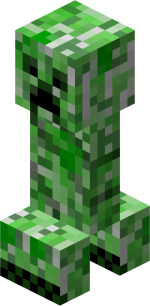 |
| Skeleton | Skeletons spawn at night time (light level of 7 or less) and are equipped with a bow and arrow. They will attack you on sight. Skeletons cannot survive in the day time. If daylight comes the skeleton will burst into flames and die. | 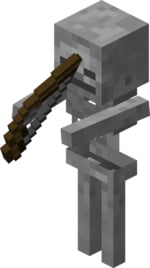 |
| Zombie | Zombies spawn at night in light level 7 or less. They will attack you on sight. Like the skeleton, the zombie cannot survive in the day time. They also burst into flames and die. | 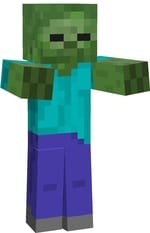 |
There is a lot more to survival than mentioned above. However, that’s all the basics you need to know when trying to survive your first night in Minecraft survival. Now I will discuss what to do first. This will include gathering materials, making tools and building your first house.
What to do first
Now that you know the basics. It’s time to jump into a game. Let’s go!
Gather Wood
So you’ve spawned into a world. The first thing on your list is to gather wood. Wood will be used to do a lot of the basic level crafting in Minecraft. You can find wood inside the trees. Go to the bark of the tree and start punching it. You will start to gather woodblocks.
Pro Tip: When gathering wood make sure to take all the wood out of the tree. The foliage left behind will drop saplings that you can plant again. Planting saplings will enable the trees to grow back again. This will ensure you always have trees nearby for wood collecting. It also makes the world look a lot more beautiful.
Make a crafting table
When you have collected enough wood. The next thing to do is make a crafting table. To make a crafting table you need to enter your inventory by pressing E on PC. Square on PS and X on Xbox. You will see a small 4 block crafting table. The next step is to make planks. Place some blocks in the crating table. Each wood block makes 4 wood planks.
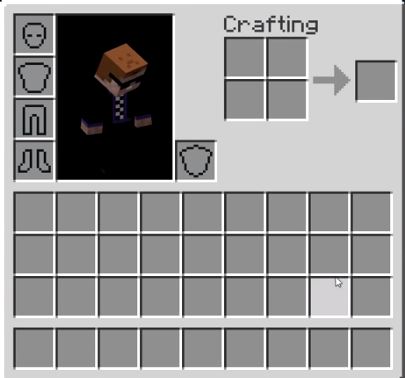
With your wood planks, create a crafting table. To make a crafting table you need four wood planks. When you have made your crafting table. Make sure to place it in your active toolbar. To use the crafting table right-click to place it somewhere, then right-click again to access it. LT on Xbox, L2 on PS.
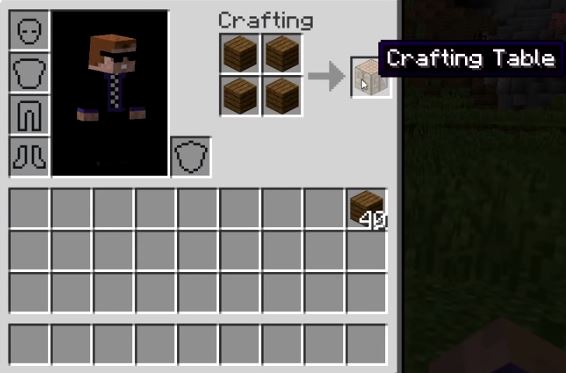
Pro Tip: You can destroy your crafting table by hitting it with an axe. The lost materials will be replaced in your inventory. You can use this again to quickly make a crafting table anywhere you go.
Making Sticks
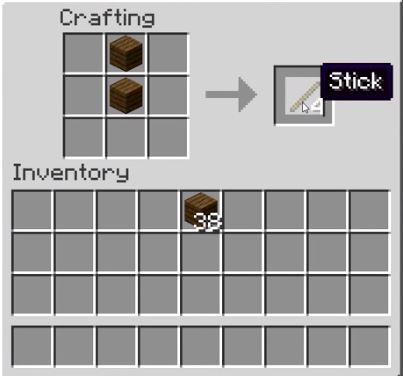
When you have made your crafting table. The next step is to make sticks. Sticks are used to make weapons and other items. Place one plank above and one below anywhere on the crafting table to make four sticks.
Making tools and weapons
You will now use sticks and planks to make some wooden items. Below is a table with all the wooden tool formulas. I would go ahead and make all of these right away. You will need them all somewhere along your journey. So it is best to get them out of the way early.
| Item | Use | Formula |
| Wooden pickaxe | Used to mine for wood and stone and attack mobs. | 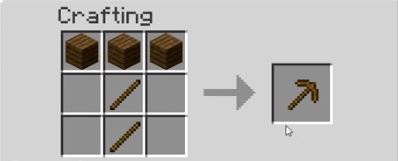 |
| Wooden sword | Used to attack mobs. | 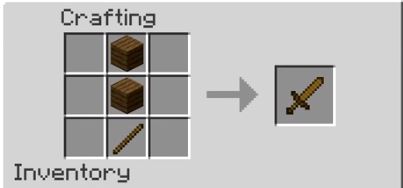 |
| Wooden shovel | Used to mine for sand, gravel, and dirt faster. | 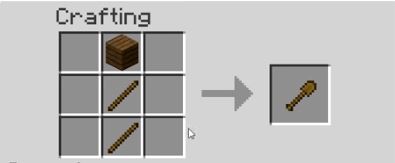 |
| Wooden hoe | Used for farming and harvesting. | 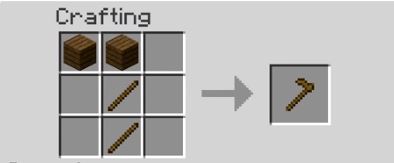 |
| Wooden axe | Used for collecting wood materials. | 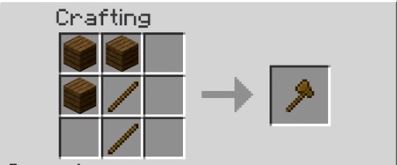 |
You now have some weapons and tools. This will make it much easier to gather resources and fight enemies. However, wood is quite weak and will break quickly. The next thing you will need to do is gather cobblestone. Cobblestone is used to make stone items.
The below example is used with cobblestone. However, it does not matter what type of stone it is. If you find a different type of stone in abundance. Please use it. The same process applies.
Gathering cobblestone and making stone items
Look around the world for cobblestone. It is a great stone that can be found abundantly throughout Minecraft. Gather it by hitting it with your wooden pickaxe. After you have gathered some stone. Go back to your crafting table to make some stone items.
You don’t need to make all of the items below. However, you will be using a pickaxe a lot so it is recommended to make one. Perhaps make a stone sword to fight off mobs easier. Stone is generally more durable and faster than wood.
| Item | Use | Formula |
| Stone pickaxe | Used to mine for wood and stone and attack mobs. | 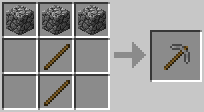 |
| Stone sword | Used to attack mobs. |  |
| Stone shovel | Used to mine for sand, gravel, and dirt faster. Mines slightly faster than wood. | 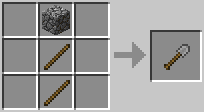 |
| Stone hoe | Used for farming and harvesting. | 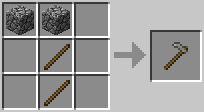 |
| Stone axe | Used for collecting wood materials. | 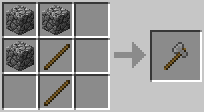 |
Gathering Coal
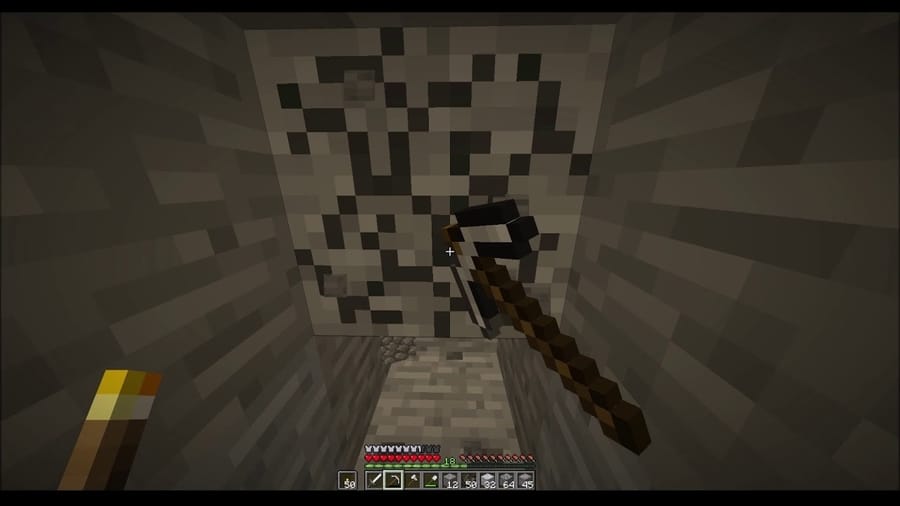
While you’re gathering cobblestone. Keep an eye out for coal. It is an essential resource to have in Minecraft. Coal is found inside stone blocks. The stone blocks containing coal have small black squares inside. Coal is used for making torches and cooking food.
Killing animals and eating
You will have to kill animals regularly to make sure you don’t starve to death. Cows are a great source of meat. Killing a cow will give you 3 raw pieces of beef. However, never eat the beef raw. Make sure to cook it first as you can get food poisoning and die. There are many other animals you can kill for food. Some of the most common edible animals can be found in the table below. These include chickens, pigs, cows, and sheep.
| Animal | Provides |
| Chicken | 1x whole chicken and eggs |
| Pig | 1 to 3 raw pork chops. Killing it with fire cooks the pork chops |
| Cow | 1 to 3 raw beef. Killing it with fire cook the beef giving you steak |
| Sheep | Up to raw mutton. Killing it with fire cooks the mutton. |
Making a Furnace for Cooking
When you want to eat you will need to cook your food. Eating raw food can poison you. This is where the furnace comes in. The furnace is used for cooking food to make it edible. It’s also used for smelting items in-game. To make a furnace, open your crafting table and place 8 pieces of cobblestone in the shape of a picture frame. Leaving one empty square in the middle.
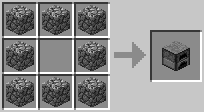
Using the furnace
Well done, you have a furnace. Now place it in your inventory. Right-click to place it and right-click to use. The furnace has its own menu. The menu has two boxes on top of each other. The box at the bottom is for fuel. The box at the top is for food and other materials. Simply place the fuel you want to use in the bottom box and the furnace will light. Then place your food in the top box to cook it. However, there are different types of fuel you can use. Each has its own efficiency. For example, coal will burn longer than wood while lava burns the longest.

Building your first house
Now that you know the basics of surviving and making tools and weapons. The next thing you will need to do is build a house. Having a house in Minecraft is essential especially as a beginner. Most of the hostile mobs will spawn at night so a house provides safe shelter.
Firstly, gather some more wood. You are going to need wood to build your house. You will need about 20 wood logs. It doesn’t matter what type of wood it is. Then turn on all the wood logs into wood planks.
Next, clear a patch of land where your house will go. This means destroying all the grass and flowers in the area where you want to place your house. Clear enough room to fit 4, 5 block wide walls.
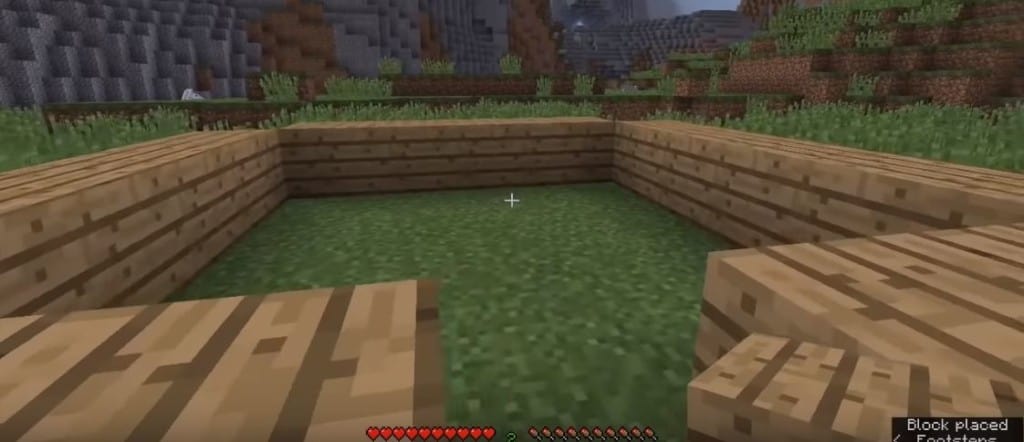
Make 4, single block walls, 5 blocks in width each way. This is the foundation. Make sure to leave a gap on one side for the doorway. Now make the walls. Build the walls 3 blocks high on each side.
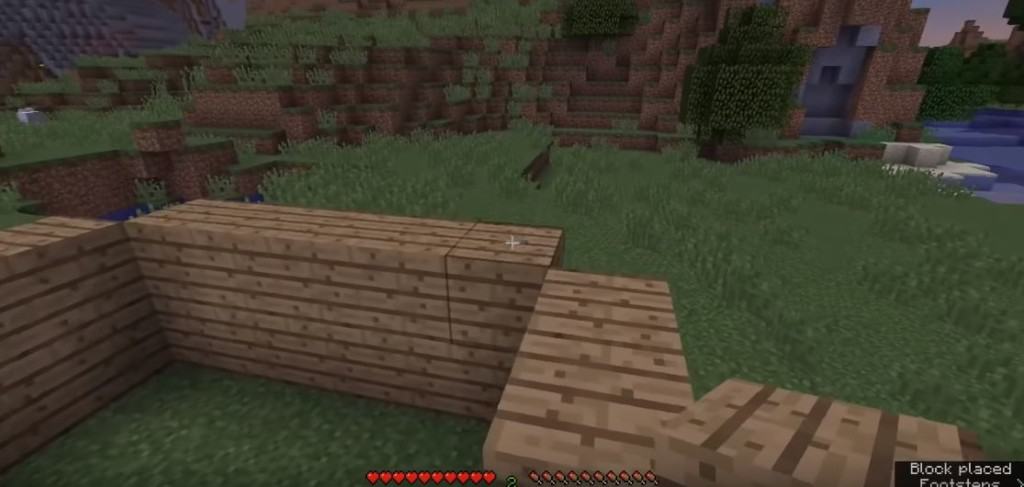
Next, make a door for your house. Place a crafting table in your house. Open the crafting table and make a door. Place the door in the gap you left in the wall. Place one more wood plank above the door.
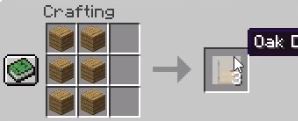
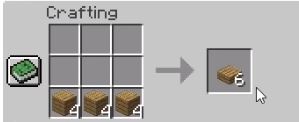
When the door is in. Make wooden slabs for the ceiling. Go to your crafting table and turn some wood planks into slabs. Place the slabs above you, level to the height of the walls.
Finally, place some torches down so mobs don’t spawn inside your house at night.
Finally, your house is built. Congratulations. You have successfully survived the first night in Minecraft survival.
Above we have learned the basics, how to dig for wood and stone. How to make wood and stone items and how to hunt for animals and cook. Finally, we learned how to build a house. You are now equipped with great knowledge to bring further into your survival journey.
You are probably wondering what to do next. You can wait it out all night, which is boring. Or you can start mining the night away.
Before you start mining. Check out our mining guide below. We layout step by step the best methods and tips and tricks to follow when mining. We also guide you on where you can find diamond, emerald, and other valuable minerals.
Pingback: Minecraft Mining in Depth – Layouts, Diamonds, and MORE – KavPlays – The Best Gaming Guides On The Web
Pingback: FASTEST Ways to Travel in Minecraft 1.4 – KavPlays – The Best Gaming Guides On The Web
Pingback: How to start a farm in Minecraft? – KavPlays – The Best Gaming Guides On The Web
Comments are closed.